I gave a lot of thought about what I wanted my pages and overall travel journal to look like when it's finished. I know that I don't want it to look formal or store bought. I know that I want it to feel very textural and I want it to be a reflection of the kind of vacation we're going to have; a fun, food, family and friend - filled two weeks!
PREPARING YOUR PAGES FOR JOURNALING:
It's important to remove some of the pages from your composition notebook (or other journal) to make room for additional travel treasures that you want to include. If you don't remove some of the pages, your journal will be bulky and will not want to close.
I removed 2 and 3 pages at a time in my journal. Here's how I did it:
- Take the first four (or 5) pages. Remove pages 2, 3, (or 4) at the red, left-hand margin.
- Glue page 4 (or 5) to page one. (I used Mod Podge for this) The back of page 4 becomes the left side of your second spread.
- TEAR your pages. This will give you a seamless finish when you glue your pages together.
- Save the pages you tear out to use in other art projects!
- As you near the end of your journal, begin counting your remaining pages to make sure you have enough spreads for your trip!
TIP: Take advantage of the fabulous scrapbook papers that are available!
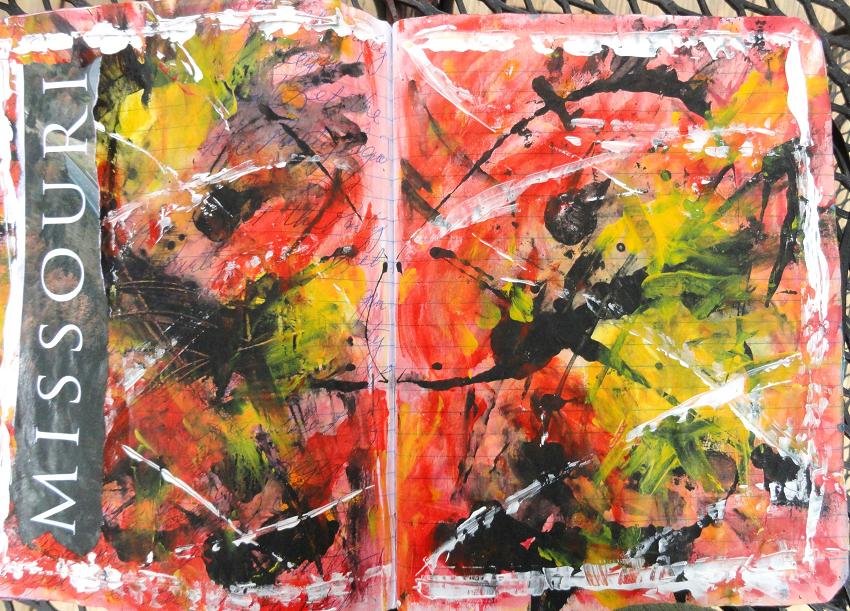
My very first spread is devoted to an index. I will index my pages for Missouri on the left and California on the right. I will probably print my index directly on the page for MO, but for the darker, brick page (scrapbook paper), I think I will type and print my index titles and glue them in for a more graffiti style look.
I have painted almost all of my pages with washes of craft and artist acrylics.

My next spread is reserved for the airport and flight to MO. I haven't flown for well over ten years so I'm sure my experience is bound to be different than I remember. This will give me a space for writing down my thoughts at the beginning of our journey and will be something to do on the flight.

TIP: Even if you've been to your destination before, order travel brochures online. They're usually free and a great source of imagery for your journal!
My next spread is for our first day in Missouri. We arrive early in the day so I'm sure there will be plenty to document.
We don't have an itinerary (YAY!), but I am planning an art play date with my friend, Barb! We've never met in person before but have developed a lasting friendship over many hours on the phone. I included an extra spread because I know that day will require four whole pages!

On this spread, I only removed the top and side sections of pages 2, 3 and 4 so I would have a special place for journaling.

I cut each page about 1/2" shorter than each previous page and added scrapbook paper to the edge of each page for a little more support. I also added scrapbook paper to the front and last of the 3 pages. I have plenty of additional room for journaling and any other small mementos that I want to include for this day.


TIP: Plan on using one spread per day. This should give you plenty of space for journaling, sketching and photos.

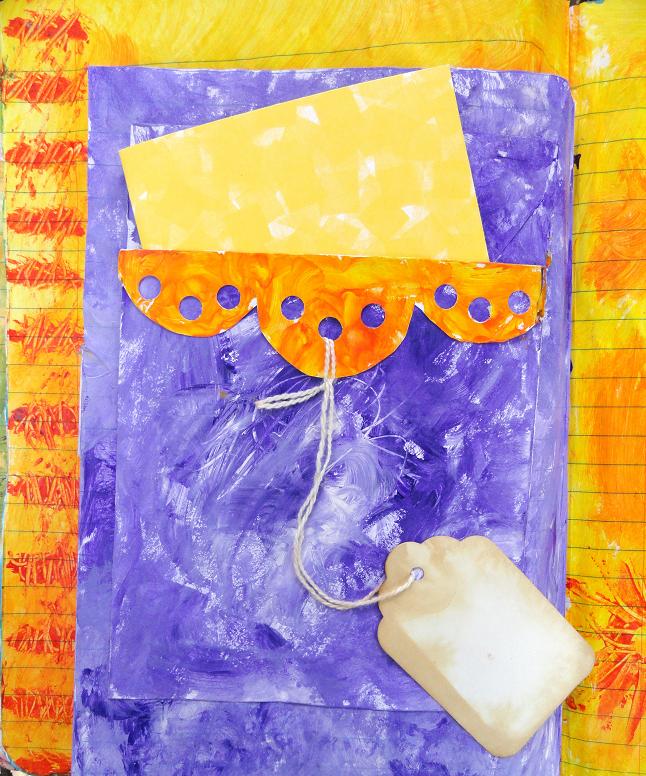
The purple inset on this spread is a pocket I made using 4 pages. I'm not going to show you how I did this because it was a HUGE pain. I like how it turned out, but you'll note it's the only one in my journal!


I put a pocket on the back of my pocket. (Clever, huh? I was out of control!) The orange part is the front of the pocket folded down. I used a paper punch to make the decoration and tacked the tag down with a spot of glue after looping it through one of the holes.
I tore about an inch off of the right hand side of the next spread.....and accidentally the one after that, too. I'm sure it will end up being a happy accident. I can add some tabs and they won't necessarily have to stick out beyond the covers. (Although I love that look, I'm thinking they will just get ruined during my travels. That might be something I do once we return home. Hmmmm.........)


TIP: Use old or current maps of your destination as part of your backgrounds!
Here's another "flight spread" for our flight to CA. We have to change planes in CO or TX (the airline can't seem to make up their mind). I'm sure I'll have plenty to write about!

My first CA spread is a big deal because we've never been on the west coast. I wanted to have plenty of space for photos and for writing down my initial impressions. The "CALIFORNIA" is scrapbook paper I was lucky enough to find here in Ohio. The blue booklet is also scrapbook paper. The only thing that is painted is the left side margin.


I allowed to spreads per day (that they will be off work and with us all day) because I anticipate lots of carry out menus and photos, and lots of sight seeing. I'm really looking forward to the very artsy, Laguna Beach!
I made an envelope out of this 12' x12" scrapbook paper that I HAD to use. I love it!


As you can see, I've only got 1 1/2 spreads to complete - the "flight spread" for the trip home, and the final page will be "Home Sweet Home"........
Because as Dorothy said, "There's no place like home."

THINGS TO CONSIDER FOR YOUR PAGES
- Consider your destination. For example, if you're planning a vacation that involves most of your time in the woods, you may want to prep all your pages similarly using lots of earth tones and nature imagery on your borders.
- Do you plan on doing a lot of sketching? You may want to take along loose sheets of paper or another journal that you don't mind tearing pages out of. (I'm going to take along a small journal for quick sketches.)
- You might want to number your pages or at least write the day or date somewhere on your pages so you allow enough spreads in your journal.
- Remember that your prepped pages are backgrounds and will be mostly covered with photos, sketches and ephemera. If you're like me, it's easy to become tempted to add too many details.
- The more work you put into your journal before your trip, the more fun and pleasurable it will be to add memories and treasures day to day.
I hope you've found this helpful, and I invite you to come back next week for my last installment of Travel Journal.
NEXT WEEK: PART FOUR
Embellishments and add-ons
CELEBRATE * LOVE * CREATE
Missouri is absolutely my favorite. I always admire people who can journal on any type of pages. I have this obsession with fancy, no-lined journal. It is my demise :)
ReplyDeleteLOL, Ana! You really should try journaling on other papers. Maybe instead of committing to an entire journal you could try a single sheet of lined paper. I think you'll be happily surprised :o)
DeleteWhile in Laguna Beach be sure to visit the Sawdust Festival. It's one of the three art shows that occur in summer months. Loads of colorful inspirations. Thanks for the tutorial.
ReplyDeleteHi, Jan! It's my pleasure to share this tutorial! Thanks so much for the tip on the Sawdust Festival. I remember my son mentioning it last year. I hope we aren't too late to enjoy it! :o)
DeleteOH MY GOODNESS...!!!
ReplyDeleteWonderful. Loads of INSPIRATION... seeing all these art journal pages.
WOW!!:]
Really like your use of art elements & techniques.
Thank you for sharing your talents. ~xx
Thanks, April! I've had a lot of fun with journal and I can't wait to actually use it! I'm really going "over the top" with it. I'll also be using stamps, stickers, tags, and other goodies left over from my ATC and altered book adventures. I'll go over those next week :o)
DeleteWOW and WOW Angelia... your travel journal is gorgeous... so LOVE the colors and backgrounds... and how wonderful to be so organized... thank you for sharing with us... seriously inspirational...
ReplyDeleteHugs
Jenny x
Hey, Jenny! Thank you. I'm only faking being organized. LOL I'm finding that it takes a huge amount of effort on my part. I'm happy to share these techniques with all of you. At the end of my vacation, I'll also be sharing what did and didn't work out so well. ♥
DeleteHello beautiful! I've missed you.
ReplyDeleteWhat an excellent post. I'll have to prep a journal for my upcoming vacation too!
Hey, Girl! So excited to see you. Hope all has been well. I'll get over to visit ASAP ♥
Delete