Showing posts with label collage. Show all posts

Thursday, April 26, 2012

Weekend Journal

It's been a busy couple weeks!  After just one week of vacation from the usual daily grind, Keith and I both found ourselves struggling to get back into the "groove" of things.  It felt as if we'd taken off more like a month!  I think we're finally back on track.


I spent a little more time playing with my new watercolors.  I gessoed the page and then poured and splattered blue and green watercolors wet-into-wet, wet-into-dry, and everything in between.  What I could see was this tree and landscape, so I enhanced what was there.  I added violet and yellow to liven things up a bit.


I had torn the top Blue Jay image out of a magazine, and it kept falling out of my journal.  What was I to do except create a page around it?  One of my students saw I was working with it, and as it turned out, she had the mate to it and happily gave it to me.  This is a mixture of acrylic washes, Mod Podged magazine images and text that I assembled in the "intuitive playing" method.


This is another intuitive playing spread, created in much the same fashion as the spread above.  I'm surprised to see myself using so much green and yellow.  I guess I needed the change.


This spread was also created in an intuitive fashion, only this time, I didn't use any magazine images.  I started this page with a dip pen and black India ink.  I drew a random pattern of squares and it evolved into this.  It's mostly craft acrylic.


Here's the latest addition to my journal, a WIP begun in my journaling class last night.  The lesson was using your hand as a self portrait.  I may have to detail that in a Tuesday Tips and Techniques in the near future.

WOMEN'S  CENTER


I can't believe it's that time of year again - my art workshop with the women of the SMART (Single Mothers Achieving Real Triumph) program!  We had our workshop last Friday, and I met a terrific group of women in the final days of the quarter.  I'll write more about this after next week's graduating ceremonies.


NEW VIDEO


I've been on a roll with the videos lately.  Thanks to my "tech guy's" help, I've been able to get Windows Movie Maker to cooperate with me!  The real test will come when I try to record and publish actual video footage as opposed to stills.  Here's my newest video, "Inside Out".  Please enjoy and check out my other videos if you haven't seen them yet.  You can watch them on YouTube by clicking on their icon in the lower right of the video screen.


Everyone  have a wonderfully restful and creative weekend.  Pamper yourself, ok?  I took my own adivce.  I used this wonderful coffee cup that Nadia brought me all the way back from the Kiltrea Bridge Pottery Company in Ireland.  The photo doesn't do justice to the beautiful glaze on this mug.  She also brought us into the current century with this awesome electric teapot, and dark chocolate from See's in California.  YUUUUUUMMMMMM!

 I had been savoring one piece of chocolate a day, but yep, I ate all three of these with my favorite cup of Chai.  Now I have to go walk!  I'll see you back here on Monday with some more of my musings.


CELEBRATE * LOVE * CREATE

Sunday, March 25, 2012

Weekend Journal

I tend to go through "technique spurts", and this week it's been all about layering.  I created two more journal spreads using the techniques I shared in the last Tuesday Tips and Techniques.


The inspiration from these pages began with the magazine image of the woman running up her pharmaceutical stairs, and another magazine image of a tee shirt which reads " Why would you want to be like someone else?  It's exhausting just being yourself."  Amen!
My friend, Staci, gave me some magazines last week, and these pages were inspired by images from two of those magazines.


The predominant face is a black and white photograph taken by Andy Warhol.  The eyes captivated my attention and she demanded to be placed on the page - with a makeover.  I was also inspired by a headline which declared, "The Mind Has To Travel" - hence the bicyclist.  The fish and bird imagery evolved on their own.

I had a couple pages that had been smeared with magenta paint from a previous project, so I added more magenta, blue,black, and white in irregular geometric shapes.  It wasn't long before the pages began to take on a Piccaso-like feeling.  What else could I do?  I had to go with it!


The pages seemed a little boring to me, so I flipped through my newly acquired magazines and began cutting black and white patterns, words and letters to add some interest.  I couldn't pass on the mouth, and I like that it feels a little whacky and out of place.

Tapestry Cat


Keith and I finished our last puzzle of the "winter". ( I have to use the term "winter" lightly as I was absolutely roasting on Wednesday as the thermometer climbed above 80 degrees.)


I've enjoyed puzzles since I was a pre-schooler.  Each little piece is a miniature work of art in itself, and I love handling the pieces.  Even the sound of the pieces being poured from the box brings back a feeling of comfort and nostalgia.

Keith and I browsed puzzles on the Internet one evening, and as soon as I saw Tapestry Cat, I knew I wanted it.  Luckily, it was an appealing puzzle to Keith, too.  What wasn't appealing was the price - $16.00?  I don't think so!  I put Tapestry Cat out of my mind.  A couple days later, I was browsing the shop at a local senior center when what should catch my eye?  You guessed it - Tapestry Cat, and a steal at only 50 cents! (Yay - more art supplies for me)  It was a bargain even if there are four pieces missing!  Gotta love synchronicity.

Now that Keith and I are "empty nesters", it's a great way to hang out together after dinner and "coffee on the veranda".  We turn on our favorite 70's music station and recall "the good ol' days" as we work on the puzzle.   It's a great way to celebrate our lives, love each other, and create a pieced masterpiece.

I hope you've had a wonderful week filled with creativity, and I hope the upcoming week is wonderful for you as well!

CELEBRATE * LOVE * CREATE


Tuesday, March 20, 2012

Tuesday Tips and Techniques: Formula One

I received a very nice email from one of  my subscribers that read in part,  "... I thought I would be a natural, as right handed people are suppose to be naturally artistic, but I can't even get a journal going!  It's really frustrating and depressing.  What can I do to get started?  Sometimes I want to scream!~X( at wits' end"


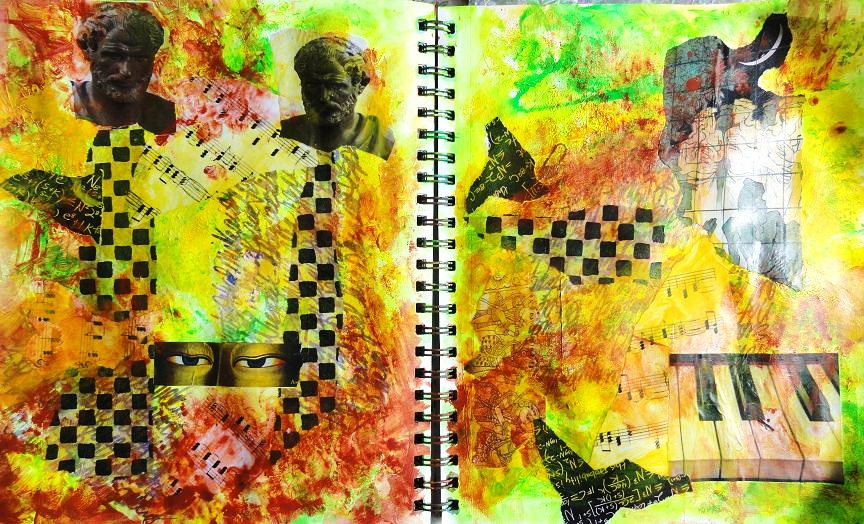
I was happy to send her my favorite journaling formula, and I thought you would enjoy seeing this formula, too.  I use this formula when I want to work in my journal but don't have anything specific in mind.  In today's post, I'll show you the formula I used to create this two page spread as well as many other spreads.


1.  Begin with a gessoed page.  Gesso will give you a nice surface to work on and will also add texture to the page as well as increased sturdiness for all of these layers.  After the gesso has dried (perhaps with some help of a heat gun or hair dryer), add a block or more of text with a Sharpie, gel pen, or your favorite writing pen.


It doesn't matter what you write.  I like to use this opportunity for whatever is on my mind at the time.  It could be a rant, lyrics to a song, or random ideas.  I usually write these block of texts upside down or sideways.  When you've finished writing, cover all or most of it with a thin layer of gesso or acrylic thinned with water.


2.  Once this layer has dried (it shouldn't take too long), apply a wash of two colors.  I used craft acrylics for this spread.  I selected neon yellow and neon green.  This wash ties your pages together with cohesive background color.  Have fun with this layer!  I apply the paint directly to the page in swirls and drips and add water directly to the pages.  Let the paint swirl and blend together by holding your journal up and tilting back and forth.  Make puddles of your selected paint colors and drop them into the wet background.  Blob areas of color with wet paper towel.  Flick paint specks on your pages by running your thumb across your loaded brush.  Make prints with your finger tips.  Have FUN!


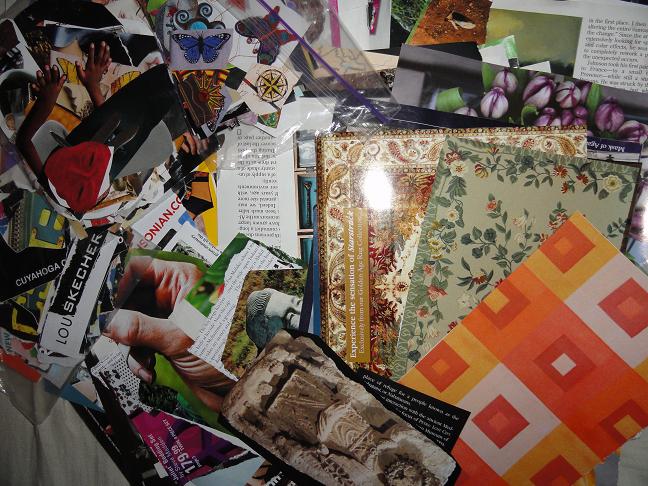
3.  While your wet pages are drying, pull images from your photo files, grab scrap off your work area.  Do it without any rhyme or reason.  Just pull images that appeal to you at the moment.  Be spontaneous!  Pull more than you know you'll use.  That will give you plenty to play with.


 4.  If your pages aren't dry at this point, help them along with your favorite drying device.  Begin tearing and cutting images that appeal to you.  Don't give it a lot of thought.  Just let the magic happen - put The Muse in charge!  Pay attention to composition.  I tend to work in threes with pattern:  I tear each different patterned paper into three unequal sections and place them in an arrangement that's pleasing to me.  I use Mod Podge (no surprise to my avid readers!), to apply everything to my pages.


5.  Once this has dried, add another wash of two colors.  I selected more yellow and burnt sienna for my next wash.  I use the same technique for application as I did with the first wash.  This also helps to tie both pages together and pushes everything into the background.  Don't forget to let some of your original wash show through.  This helps to add depth to your page.  At this stage, I begin looking for imagery.  When I looked at these pages, I thought the checkered pattern on on the left looked like hair.  


6.  At this point, I begin making my light areas lighter and my dark areas darker.  I also begin adding more opaque layers of color, especially near the collaged items.  I don't want the collaged items to look like they're just stuck on - they need to blend in with the rest of the pages and become part of the whole design.


7.  Now it's time to add details.  I added splotches of transparent, raw umber acrylic ink.  I dribbled and smudged the ink along the outer edges of the pages to add depth and a nice border.  I completed the details of the face, and I darkened some of the areas.  I usually also add two or three other collaged elements at this point - mostly just because I like the way it looks!  The final step is to write another couple lines of journaling. At this stage, I generally write only one or two sentences that reflect the imagery on my pages.


And there you have it!  A journal spread that's cohesive in color, pattern and composition.  More often than not, you'll find items that you've incorporated are both symbolic and literal in relation to what you initially wrote in your first blocks of text.

I hope you find this formula for journaling helpful as you continue your own journaling endeavors.  If you give this method of try, I hope you'll show me your results.  If you have any questions or additional thoughts, comments are encouraged.  I love hearing from you, and I do believe I have solved the annoying word verification issue!   Happy Creating - and Happy First Day of Spring!

CELEBRATE * LOVE * CREATE

Thursday, May 19, 2011

Ideas

I completed another spread in my moleskin.  This time, I decided I wanted to begin with collage, so I flipped through my picture file and these patterns caught my attention.  I put them on the pages with what else - Mod Podge.


I didn't really know where I wanted to go with it, but I through it would be fun to try my newly learned scribbling techniques.  I wanted to see if I could duplicate the gray background.


I began on the left page using red scribbles.  I also wanted to duplicate one of the "light bulb" shapes from the collaged paper and I wanted to leave a space white for writing something.


I used different colors to build up the gray tone.  After using red, I went to cloud blue


I continued adding layers of colors, all the while thinking about what the light bulb reminded me of.  As I added each layer, I began thinking about the light bulb as a representation of an idea, and I thought about each little scribble as an idea that crosses my mind during any given day.


I added a third layer of a dark, cool gray


And then I added a fourth layer of olive green.


I finished the light bulb shape and I wrote this quote by Anais Nin: "My ideas usually come not at my desk writing but in the midst of living."  How true is that?  I thought about all the different places I'm in when ideas come to me.  Rarely do they come when I'm at the desk in front of my materials.


I completed the right side of the page with a quote from Picasso: "You have to have an idea of what you're going to do, but it should be a vague idea."  That just about sums up the way that I approach my own art endeavors.  I'm happy to discover that I have something in common with one of the artists who influenced me early in my art career!


Here's my finished spread.  I didn't quite capture the gray in the collage paper, but it works for me.  I thought about the light bulb shape on the left and how it represents the way we have millions of ideas everyday and how we come to isolate one and try to bring it to it's full potential.  I hope that in the midst of your day, you isolate one of your great ideas and bring it to life as you "Celebrate, LOVE, and Create!"

PHOTO OF THE DAY

"Horsing Around"

If my the horse seems a little stiff, it's because he's in the wax museum at Niagra  Falls in Canada.  Keith took this  photo when were on a holiday in 2007.  I had way more fun than the horse! 

Monday, April 18, 2011

Glue, Paper, Scissors

I was looking through my stacks and stacks of pages torn and cut from magazines, doodle scraps, and  scrapbooking paper - some of which I've had for years.  I was trying to convince myself to sort through the quagmire and toss some of it into the circular file when I had a brainstorm.  I decided I would try to compose a spread with nothing but glue, paper and scissors.  That's right - no paint, no crayons or markers, no pencils. Does that make me crazy? Probably! Ha!


I sorted through the yummy, colorful pages and images and began to pull items that appealed to me.  After I pulled some main images, I began to gather patterned paper that seemed to "fit" and I tore it into strips.


Feeling that I had more than enough for 2 pages, I decided to pull out 3 different colors of scrapbooking paper that would serve as the background for my collage.


I cut these pages into smaller blocks of random sizes and applied them to the pages with double stick tape.  I distributed the color in a color composition that would help to lead the eye from one area to the next.


I took my main elements and placed them in various positions on the pages to get an idea of where I would place them permanently.  Once I decided where to place them, I removed them from the page and began "painting" the background with strips of paper to add interest and color.  I also cut some of the paper strips into triangles.  I used a combination of glue stick and double sided tape to apply the paper strips and images to the background.


Here's my completed spread.  I enjoyed the process even though I had to fight the urge to pull out the markers.  I'm going to put this spread in the "success" column, and I have another 2 or 3 spreads in mind to complete with this same technique.


Challenge yourself to work on a couple spreads using only paper collage.  It will force you to go through those yummy stacks of paper and images that you've been saving, and you'll have a blast as you "Celebrate, LOVE, and Create!"

Wednesday, April 13, 2011

Playing with Layers

These are some pages that I completed last week.  I haven't done any more pages since these because I've happily been involved with other activities involving real people (yes, I have to go outside of my own mind occasionally!), and sadly, I've been sick!  Keith had a birthday on Sunday and we enjoyed the day with Nick, Heather and Mike.  It was our first 80 degree day and we enjoyed being outside to the fullest.

I've been sick all week with a horrible head cold.  Yesterday is a vague memory of sleeping and coughing dispersed with The Waltons and various other sitcoms and "Girl TV".  I made it to my colored pencil drawing class this morning.  My instructor was out of town last week and today and asked me to take over the class in her absence.  It's been fun and I'm happy to say that my classmates eagerly and gratefully enjoyed what I had to offer.  I was a little anxious as I had big shoes to fill.

OK...enough of my rambling. Last week,  I was in the mood to get messy and play with layers in my journal. I concentrated on adding texture and collaging papers to my background.


 I was watching the movie, "Eat, Pray, Love" while I was working on this spread.  I really enjoyed the movie and have watched it twice.  Although it was a little long in parts, it was beautifully filmed and I think it's worth the watch.


As is typical for me, all of these spreads were intuitive; meaning I had no plan when I began other than to collage paper to the background.  In this case, I used an inexpensive, unmounted rubber stamp and acrylic glazes.  I sketched in the fish and face.


This is my favorite of the 3 spreads.  I began by using Mod Podge and magazine images collaged on the pages.  I dug through my portfolio of images, words and phrases and chose items that seemed to fit well together.  I used water soluble crayon for color, layering them like watercolor washes and then coloring heavily in areas like crayon.  I then scratched through those areas to add more texture.

Using different methods of journaling keeps your pages fresh and prompts you to think in ways that are different from your norm.  Experimenting with your usual mediums will also allow you to discover new ways in  which they can be used.  Whatever you're doing in your journal this week, I hope you're able to do it without coughing, sneezing and sniffling, and I hope that even if you are feeling under the weather, you still find a way to "Celebrate, LOVE, and Create!"

Friday, March 18, 2011

Playing with Water Soluble Pastels

Here are pages from my journal that I did last week.  I hadn't played with my water soluble pastels for awhile so I took them out one evening.  I didn't want to turn on any lights, so I decided to sketch by the light of the television as Keith and I tortured ourselves with the Food Network.


I used an ochre yellow pastel and began sketching.  I began with a fluid line and before I knew it, I was sketching faces.  The next day, I softly blended the features and I liked the ghostly appearance that resulted.  I darkened some of the features and added hair with a black pastel and did more blending.  I added blue to the shadow areas and more faces with the same blue, softening each layer.  


I continued playing with my pastels and another face emerged.  I recently discovered that I can print right to left writing each letter backwards as easily as printing normally.  Who knew!  I had no idea I could do this and it was a fluke discovery.  I incorporated printing in this style on this journal spread and I think it adds to the overall feeling of mystique created by the chiaroscuro.


Speaking of faces, my colored pencil drawing is coming along nicely.  I'm really enjoying my very laid back class.  My classmates are awesome and we're rapidly becoming friends.  I've learned a lot about colored pencil - mostly that it's nothing to be hurried!


I'm not finished with her face, but the self proclaimed "queen of color" had to get away from the skin tones for awhile and add some color!  The leaves are a pain (it crossed my mind to put a head wrap on her!), but I decided to stay true to the original image.  I only work on her during class.  The lighting there is fabulous!


I've also been using colored pencil more in my journal.  This detailed spread is collage (The sun/moon mirror, the tree and the head, torn from an old Design Tuscano catalog), Pilot VBall pen, and Prismacolor pencils.  I worked on it mostly in the evenings.  It was inspired by my prompt for March 10th: "I don't want to", and the song by Gavin Degraw, "I don't want to be".  The writing is lyrics from that song.


I hope you're having fun in your journal.  I hope you're experimenting and breaking through "blocks" that you may have.  Most of all, I hope you're finding time each day to "Celebrate, LOVE, and Create!"

Monday, December 13, 2010

A Beautiful Life

Creating art is a beautiful life but contrary to popular belief, the creating begins long before the paints and canvases are pulled out.  Creating begins with the appreciation for all that surrounds us, and the warehouse of appreciation I have gathered over the years is where I get my inspiration for the art I create. 

I'm a maniac about not wasting paint, so when I finished my last journal spread I spread the left over paint on the next blank pages in my journal.  "Waste not, want not", Mom always said.


What I notice immediately is the makings of a face.  Do you see it?


The second thing I notice is all the white of the left side of the spread.  I must take care of that immediately!  I put small blobs of paint directly on to the page using the same colors I used yesterday and a lot of white.


I spread the paint in a random pattern with my wet brush, and decide that I'm in the mood to do some collage.  I haven't done any collage in a while!


 As the paint dries,  I go through my file of magazine pages and images and pull out a dozen or so images that "speak" to me as possibilities for this journal spread. Once again, I have no idea where I'm going with this.


Then I go to my baggies filled with words and smaller images and see if anything feels appropriate for this spread.


I settle on a dozen or so images and words that have a possibility of making the final cut to my journaling spread. 


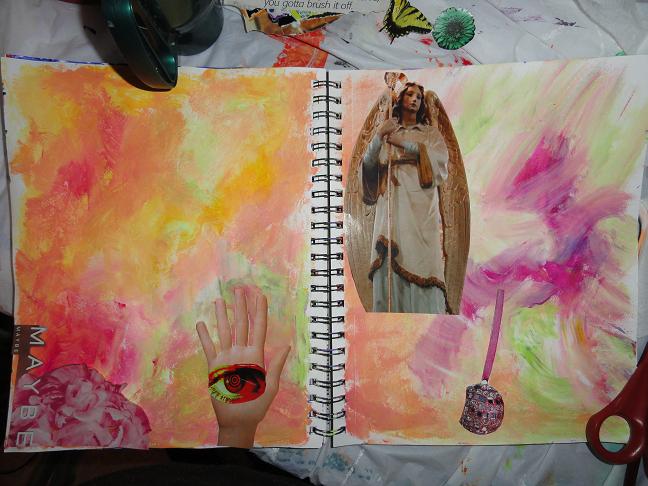
I begin to play with the placement of some of the images on my spread.  I'm immediately drawn to an image of an angel. 


I like the angel image a lot, but she just feels too heavy on the page. 


I attempt to lighten the image with a 50/50 mixture of white acrylic and water, but I don't like the way it looks.  So instead, I coat the image with Mod Podge and place it upside down on the page and let it dry.


Of course, an impatient Angelia doesn't let it dry completely.  I begin rubbing the image with water until the back magazine layer begins to rub off.  I've rubbed down to the paper in some spots, but I like the way it looks - very grungy and aged.


As the angel transfer continues to dry, I begin to work on the face using thick strokes of the same paints that I've applied to the background, and of course, black acrylic was bound to show up for the party! 


 I glued they eye to the palm of the hand and all the words on the page with Mod Podge.  The left side seemed a little bland, so I added the stars and swirls. 

I'm always amazed at how these intuitive spreads just seem to come together on their own, and I'm always grateful for the messages and reminders that I get from them.  "Creating art is a beautiful life" speaks volumes to me, and is a true representation of how I feel when I create and share my creations with others.

I hope you'll practice  "Happy Creating!" from intuition and let your journal spreads emerge on their own.  Choose colors and images that speak to you and let the art flow from your beautiful life! 
Related Posts with Thumbnails