Showing posts with label paper. Show all posts

Tuesday, October 23, 2012

Tuesday Tips and Techniques: Playing with Paper Two

Acrylic Paint Stamp Technique


This technique takes some prep, but once the prep is over you can design LOTS of paper!  The first order of business is to gather all of your supplies.  You will need stamps, stencils, card stock (or other paper - experiment! When Barb and I did this technique in her studio, we also used muslin fabric and it worked great.), craft acrylics, a paint brush, containers for mixing, water, paper towel (or white shop towels - these will act as your stamp pad), and a brayer (I actually used an old rolling pin).


The next step is to select your colors.  You want to choose three or four colors that are relatively analogous (next to each other) on the color wheel.  For example, you don't want to choose red and green or add yellow and purple together because they will become brown.  Of course, if you're looking for lovely browns, this is a good way to go.

You're going to mix your craft acrylics with water in an approximate 50/50 mix.  You want to make it similar to ink consistency.  I used an egg carton to mix my paints, filling each cup about half full.  Sparkly and metallic paints turn out great using this technique.


Next, you need to prep what will be your "stamp pad" by folding your paper towel or shop cloth.


I used a shop cloth.  First, I folded it into quarters...


Accordion-folded it all the way across, and then folded it onto itself into thirds.


Now the fun begins!  This is going to be messy, but it's going to yield lovely results.  Take a paint brush and begin applying your paint mixes to your folded towel.


Make sure the towel is totally saturated with your paint mixtures.  Open your towel in sections and be sure to get paint on every white surface.


You'll end up with a totally saturated, beautiful "stamp pad".  Now it's time to decorate some paper!  Choose your first page and lay your painted towel on top of it.


I've selected one of my Styrofoam stamps to being.  I pushed the stamp into the towel in different positions.  Part of the excitement of this method is that you don't know what you're getting until you lift the towel.

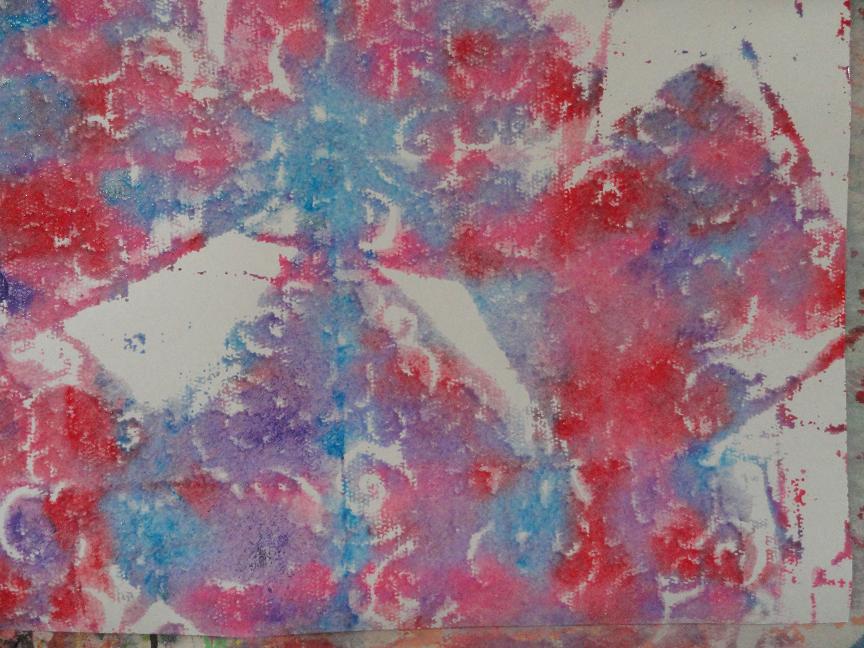

I wonder how these leaves will print?  I'll just lay them out on the paper and use the rolling pin across them.


Wow!  I like the way these turned out.  I like them a lot!


Just tossing your towel unto the paper in a haphazard fashion will put a few interesting lines and creases on the page.


I decided to use this piece of fencing that I brought back from Barb's - Thanks, Barb!


I used some more of my homemade, Styrofoam stamps...

....and then I experimented with a piece of needlepoint plastic I have.  It turned out to be one of my favorite results.


I decided to re-position my towel and add some additional stamping to the mesh background.  I like!


Combining several stamps yields surprising results.


The more you print, the softer the prints become.  I printed eleven pages with this towel, but I could have printed another half dozen.  Don't even think about throwing the towel into the trash! Let it dry and you can use it in another project.  If you've used two-ply paper, you'll be able to pull it apart when it dries.


These papers dry rapidly, so once you've finished with first printing, you can prepare a second towel and apply additional prints over your first.  You'll get some great results.   I used turquoise, light green, and gold mixes for my second printing, and I'm quite pleased with my finished papers.


I hope you'll give this technique a try.  You'll have a lot of fun and you'll be surprised at how many wonderful combinations you come up with as you're experimenting.  The only problem will be what to do with all these wonderful papers once you've finished!  Now what will I do to complete the back of these papers?

CELEBRATE * LOVE * CREATE

Tuesday, November 29, 2011

Tuesday Tips and Techniques: Clean House!

OK. I know including the word "clean" in my post title will scare a good number of readers away, but let's face it - sooner or later, "clean" is a necessary evil in creativity.  We creative types are natural born hoarders who see the creative possibilities in nearly every item we look at, and more often than not, we welcome and embrace the item into our home to give it new life.  I don't know about you, but I have a terrible time getting rid of these treasures.  

SORTING


Let's begin with those avalanching piles of crap, er, precious papers, postcards, and ephemera right next to your my work space.  Make sure to weed out everything that doesn't belong (oh - that's where the water bill went!)


Now, let's go through all those folders, bags, and other places you have your  I have my stash.  When's the last time you looked through all those magazine images, quotes, phrases and other items that you've torn from books and magazines?  If you're like me, you've had some of these images for a couple years or more.  Do they still speak to your creative muse?  Did you come across a page, flip it back and forth and wonder, "why did I save this?"  You've outgrown it.  Get rid of it and make room for new images that appeal to you!


OK.  On to the paint.  (Am I the only one that has little piles of art supplies everywhere?)  I have paints located in several different areas.  I have my "stock supply" (which is fairly neat and organized), and I have a bag of assorted paints in a tote bag.   When I run out of a color in my bag, I go to my stock supply to replenish.  


Now is a good time to assess your paint.  What colors are you running low on?  What colors might you add to your collection?  Do you have tubes with just a smidgen of paint left?  Put those aside and use those up first when you begin prepping more background pages.


It's also a good time to remove those items that don't belong to the paint family!  (Anyone know of a Stevia technique?) You may also want to look through your mediums, pens, brushes, etc.  Make a list of the things that need to be replenished.  It's not too late to ask Santa for some help!

ORGANIZING


If you haven't guessed by now, this post is selfishly more for me than you today.  Cleaning is a breeze, but when it comes to my 100 list of strong points, organization comes in at around 637.  Seriously - when it comes to organizing my materials the word that comes to mind is "overwhelming".


I'm determined to start my 2012 year of journaling in an organized fashion.  My main dilemma is categorizing paper.  Do I group by color or subject?  Do I group by genre, ie., Asian, texture, primary, seasons?  It makes my head spin!


I'm working on this today and it occurs to me that I'm over-thinking the entire process.  So here's what I'm going to do until I hear from you.  I'm going to sort all of my paper by color.  Then I will sort each color into 4 categories: 1.People (faces/body parts)  2. Nature (plant life, animals)  3. Things (inanimate objects)  4. Textures.  


That will at least put some organization into the paper for now.  I'm already thinking that I will make "Asian" a category as I already have plans for an Asian inspired journal in the new year.  


I WANT TO HEAR FROM YOU!  Please let me know what has worked for you when organizing your materials.  I'm especially interested in organizing the paper, but please do feel free to leave a comment on any helpful solutions you've found!

TIE UP THOSE LOOSE ENDS!


Do you still have a couple projects that need some finishing touches?  Now is the time to complete those journals so that you can begin fresh in the new year.


Think of how wonderful it will feel to have your 2011 projects completed and tucked away for safe keeping as you move forward into new adventures in 2012.  When January arrives, all you'll have left to do is "Celebrate, LOVE, and Create!"

Tuesday, February 8, 2011

Tuesday Tips and Techniques: Mask It!


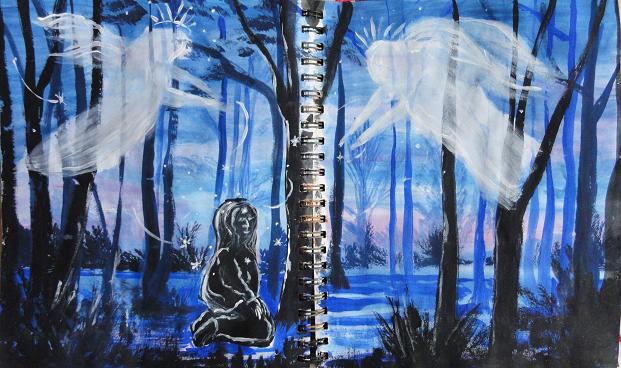
Leaving areas of your paper white when applying your background color is as easy as using pieces of torn or cut paper!  I had scraps of white copy paper left over from cutting out my zendoodles, so I decided to tear some of them into random shapes to use as masks before painting my background with water color.


I moved them around on the pages until I had a pleasing arrangement, and I decided to use a wash of watercolor in blues and purple.  I held the torn paper down by using my index finger in the middle of each piece.


Using this method, I found it best to apply the paint from the center of the torn paper to the outside of the pages.  This was to reduce any bleeding of the paint beneath the masks.


I removed the masks and was left with three white images that reminded me of a kneeling figure and two angels.  I let the pages dry and added another wash to blend the stark, white images into the page. 


Then I took a wet brush and lifted the paint to make "wings" on the angels.  I  also added a horizon and tree line.


I continued working on my pages by adding background trees in a medium blue, working darker and darker until I was using black for the foreground trees.  I also added black to the kneeling figure.  I used about a 50/50 solution of artist acrylic and water to highlight the angels making sure that the trees and branches would show through the angels so they would appear to be transparent.


I finished the pages by adding some directional strokes on the angels and wings, highlights on the kneeling figure, and little star shapes and swirls.  I also added some highlights to the tree trunks in the foreground.

Masking with paper is a quick way to give your pages some added dimension.  Try applying paint, then masks, then more paint.  The possibilities are endless!


And don't forget to save those pieces of paper that you've used for masking.  They'll be great collaged as additional texture on those next journal pages.  Whatever you do, remember, "Celebrate, LOVE, and Create!"

Related Posts with Thumbnails